Sunday, May 31, 2009

{Hct. Subligar +1}: O


Picture worth more than a thousand words... :D

Wednesday, May 27, 2009

Weapon Skill Gear Comparisons - Legs

I alluded to this in a previous post. I've been working on a named figure to rate individual pieces of gear in terms of overall effectiveness for Dragoon. I'm hoping what I develop will work over all melee stats, but it's hard to say that it will given the fact that every job has different bonuses from various pieces of gear.

An example I've been turning over in my head is something like Ares Legs vs. Hecatomb Subligar. First, the stats:


Now if you remember from this post, I went over the details of my current armor. In the legs slot, I'm using Conte Cosciales. Putting all of these stats side by side, we see:

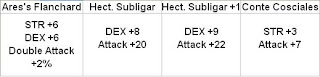
The three main primary modifiers for Dragoon are STR, Accuracy, and Attack. Referencing the previous post again and recalculating everything for the other pieces of gear, we get the following numbers:


Two things to note at this point:

1. I did not factor in the attack difference from gaining or losing STR. Just the raw Attack + numbers as I felt it wasn't going to make a huge difference in the final numbers that are shown later in this post.

2. All of the following numbers are calculated against our Level 82 Greater Colibri. Defense 330, VIT 69, 25% piercing damage bonus, using Drakesbane, yada yada.

A lot of people tend to underestimate the power of raw attack and it's effect. This obviously depends on what weapon skill modifiers you're currently using since a modifier of DEX won't get used too much if you're focusing on raw attack, but even then...attack on a piece of gear in large quantities and especially in tandem with +STR will add a lot of value to a piece. I'm not saying go and load up on every single piece of +Attack gear you can get your hands on since +STR will add +Attack as well. I am saying don't overlook the numbers though.

The numbers using those formulas:

Here you can see the drastic effect all that extra attack from Hecatomb Subligar had on your pDIF values. fSTR took a hit obviously, but it was minimal.

And the final results looked like this:


What does all this actually mean? Are those numbers suggesting that Conte Cosciales are better than Ares's Flanchard? Did I just dispel a myth?

No.

The wildcards in this are the Double Attack+2% and the Accuracy percentage. Looking at these comparisons, they both look the same, but don't forget that using Ares's Flanchard caps the all-important accuracy in this WS set up. Over a long merit party, Ares's Flanchard would beat out Conte Cosciales and has the potential to spike your damage thanks to the extra double attack. Hecatomb Subligar kicks the crap out of both of them from a numbers standpoint though.

Conclusion

If you've been following my math lessons the past few posts, you will remember the emphasis I placed on capping your Accuracy as high as you're comfortable capping it. Using Hecatomb Subligar places my accuracy cap well over the 95% ratio. Literally to the point where I could swap out something like my Love Torque in favor of a Justice Torque to push my damage higher. Using Ares's Flanchard, I'm not really afforded that opportunity, but I'm still at the accuracy cap against Greater Colibri and I'm set up for a few eye popping numbers if/when Double Attack kicks in. Also, again I'm sure I've dumped some wrong numbers in there somewhere. Feel free to point them out to me if I have and I will correct them when possible.

Lastly

Canuck's birthday today, so I'll dedicate the rest of my normally used up blog space with his birthday gift:

LOLCanadianLOLCanadianLOLCanadianLOLCanadianLOLCanadianLOLCanadianLOLCanadianLOLCanadianLOLCanadianLOLCanadianLOLCanadianLOLCanadianLOLCanadianLOLCanadianLOLCanadianLOLCanadianLOLCanadianLOLCanadianLOLCanadianLOLCanadianLOLCanadianLOLCanadianLOLCanadianLOLCanadianLOLCanadianLOLCanadianLOLCanadianLOLCanadianLOLCanadianLOLCanadianLOLCanadianLOLCanadianLOLCanadianLOLCanadianLOLCanadianLOLCanadianLOLCanadianLOLCanadianLOLCanadianLOLCanadianLOLCanadianLOLCanadianLOLCanadianLOLCanadianLOLCanadianLOLCanadianLOLCanadianLOLCanadianLOLCanadianLOLCanadianLOLCanadianLOLCanadianLOLCanadianLOLCanadianLOLCanadianLOLCanadianLOLCanadianLOLCanadianLOLCanadianLOLCanadianLOLCanadianLOLCanadianLOLCanadianLOLCanadianLOLCanadianLOLCanadianLOLCanadianLOLCanadianLOLCanadianLOLCanadianLOLCanadianLOLCanadianLOLCanadianLOLCanadianLOLCanadianLOLCanadianLOLCanadianLOLCanadianLOLCanadianLOLCanadianLOLCanadianLOLCanadianLOLCanadianLOLCanadianLOLCanadianLOLCanadianLOLCanadianLOLCanadianLOLCanadianLOLCanadianLOLCanadianLOLCanadianLOLCanadianLOLCanadianLOLCanadianLOLCanadianLOLCanadianLOLCanadianLOLCanadianLOLCanadianLOLCanadianLOLCanadianLOLCanadianLOLCanadianLOLCanadianLOLCanadianLOLCanadianLOLCanadianLOLCanadianLOLCanadianLOLCanadianLOLCanadianLOLCanadianLOLCanadianLOLCanadianLOLCanadianLOLCanadianLOLCanadianLOLCanadianLOLCanadianLOLCanadianLOLCanadianLOLCanadianLOLCanadianLOLCanadianLOLCanadianLOLCanadianLOLCanadianLOLCanadianLOLCanadianLOLCanadianLOLCanadianLOLCanadianLOLCanadianLOLCanadianLOLCanadianLOLCanadianLOLCanadianLOLCanadianLOLCanadianLOLCanadianLOLCanadianLOLCanadianLOLCanadianLOLCanadianLOLCanadianLOLCanadianLOLCanadianLOLCanadianLOLCanadianLOLCanadianLOLCanadianLOLCanadianLOLCanadianLOLCanadianLOLCanadianLOLCanadianLOLCanadianLOLCanadianLOLCanadianLOLCanadianLOLCanadianLOLCanadianLOLCanadianLOLCanadianLOLCanadianLOLCanadianLOLCanadianLOLCanadianLOLCanadianLOLCanadianLOLCanadianLOLCanadianLOLCanadianLOLCanadianLOLCanadianLOLCanadianLOLCanadianLOLCanadianLOLCanadianLOLCanadianLOLCanadianLOLCanadianLOLCanadianLOLCanadianLOLCanadianLOLCanadianLOLCanadianLOLCanadianLOLCanadianLOLCanadianLOLCanadianLOLCanadianLOLCanadianLOLCanadianLOLCanadianLOLCanadianLOLCanadianLOLCanadianLOLCanadianLOLCanadianLOLCanadianLOLCanadianLOLCanadianLOLCanadianLOLCanadianLOLCanadianLOLCanadianLOLCanadianLOLCanadianLOLCanadianLOLCanadianLOLCanadianLOLCanadianLOLCanadianLOLCanadianLOLCanadianLOLCanadianLOLCanadianLOLCanadianLOLCanadianLOLCanadianLOLCanadianLOLCanadianLOLCanadianLOLCanadianLOLCanadianLOLCanadianLOLCanadianLOLCanadianLOLCanadianLOLCanadianLOLCanadianLOLCanadianLOLCanadianLOLCanadianLOLCanadianLOLCanadianLOLCanadianLOLCanadianLOLCanadianLOLCanadianLOLCanadianLOLCanadianLOLCanadianLOLCanadianLOLCanadianLOLCanadianLOLCanadianLOLCanadianLOLCanadianLOLCanadianLOLCanadianLOLCanadianLOLCanadian

Tuesday, May 26, 2009

Long weekend is not long enough....

Memorial Day weekend has come and gone. This is the unofficial beginning of summer for most folks. Schools are usually out by now and vacations usually start. This is also when the average attendance for most Linkshells drop. You'd think the opposite, but despite what stereotypes tell us about the average MMO'er, they do tend to go outside quite a bit.

That doesn't mean it's always of their choosing though.

Anyway, was a relatively peaceful and relaxing weekend for me. Stuff I did:

Mom's Birthday

Mom's b-day was over the weekend and as usual, I couldn't get a straight answer out of her for what she wanted. So I planned a Friday night out for her. If you read a previous blog post of mine, you know that I already tricked her into going to see a movie she claimed she wouldn't like, but ended up liking. This trick only works so often, but again, she usually doesn't care which movie she ends up seeing as long as whoever is taking her buys her popcorn.

Would the trick work a second time if I risked it?

Of course. It is me we're talking about here.

Instead of not telling her which movie we were seeing, I told her we were seeing Wolverine.

"I DON'T WANT TO SEE THAT ON MY BIRTHDAY!!"

"Uhhh...I got the keys and you like popcorn, so that's too bad."

Before I tell more of this story, I need to point out one major thing that helps me out a lot when I'm trying to trick my mom.

She's 4'10".

So we get to the theater and I parked in the furthest corner of the parking lot possible, then do a near full out run about half the distance to the theater. Mom obviously can't keep up and Dad is playing wingman for me by convincing Mom to come into the theater. Once I see I'm far enough away to give me time to buy tickets without her overhearing what I'm ordering, I slow down to a walk so I don't look like a complete idiot running across the parking lot.

I buy the tickets, wait for mom and dad, get the concessions (Mom decided to be vengeful and order 2 bags of popcorn...which she didn't eat all of...) and then walk into the theater with Mom "happily" munching popcorn in tow.

At least until she sees which theater we were walking into.

"I'd rather go see Wolverine."

"It's Terminator Mom...how can you not get hyped up about seeing Terminator on your b-day!"

Movie was better than I thought it'd be and Mom actually ended up liking it. (I'd give it a 6/10. Storyline just didn't grab me, but the setting and the special effects were pretty darned good.)

As we're walking out of the theater though, Dad comments about that popcorn not agreeing with his stomach. I had to agree...my stomach was hurting some too after eating some of that popcorn. We get back to the car and I'm guessing the same thing happened to Dad that happened to me when we sat down.

We both let out some huge mega-farts.

Like father, like son right?

Yeah only Mom was in the car with us. HAPPY BIRTHDAY MOM!~ Nothing says "I love you" more than the two main men in your life simul-farting in a closed environment. The farts were obnoxious enough that it cracked Mom up. We're still not sure if the tears were from laughing or if the farts smelled.

Einherjar

Saturday morning brought on Einherjar. I'm mostly going to blame the time of year for this, but we ended up having 6 people no-show. We also ended up losing our T3 attempt with Behemoth around 10%. I could point to a number of reasons why we lost...but they're all irrelevant and aren't things that happen normally. However, the 6 people no-showing, puts "If only we had one or two more people" on the list of reasons and for me, that's pretty much the insta-pissed button getting mashed.

So having that be the last straw for people no-showing, I suspended members from Einherjar who had 3 or more on their record for the past month. It's irritating to no-end for the core of our group to show up run in and run out only to have their success hampered by a few people who are incapable of managing their time and their commitments properly.

I hate taking disciplinary action against people. It's always a last resort despite some of the jokes I make about it. I know I give off the perception at times that I enjoy it, but I'd rather not bother with it. I know taking the actions I have will result in my having to explain why I took the actions and then having to debate it out with whoever I took the action against...and that usually just makes things worse. It also makes it incredibly difficult to take action against someone when you know they're a good person.

People simply don't realize the overall effect of that spot they take up on the roster. For every person we have that occupies a space on the roster for that run, there's another person who didn't bother to sign up because they would be put on the wait list for that run. This combination can be lethal from an attendance standpoint as Saturday's run gave fine example to. They don't realize that a good portion of the time, their inability to show up causes someone else to have to go change jobs. It's all in the name of sleeping in, going out, or doing whatever else comes to mind then coming to Einherjar in the event they're free.

That's not happening anymore on my watch. People will still no-show, but it won't be the same ones over and over again.

I hope it's a wake-up call though. I had yet to suspend anyone for habitually no-showing these runs until this past Saturday and I really hope I don't have to suspend anyone else or take further action against the ones I did suspend. I had hoped that changing our point penalties around would be a good deterrent, and it has for the most part, but it's days like these I want to eliminate. I never want to have "If only we had one or two more people" on my list of reasons we have for losing a room.

Salvage

With Ring and Omoi on vacation presumably making babies next to an aquarium somewhere...Salvage has been put on hold. At least until I planned back to back runs for Memorial Day.

Nothing real good to report here other than we got all our goals accomplished and SSR and ZR still apparently suck as far as wanted drops are concerned.

We did a little bit of a different path in SSR than normal. We opted to go east at the start and head up to do Powderkeg, Gyroscopic Gears, Citadel Chelnowhatever and the boss. No 35 drops whatsoever in this run, but overall, very good considering we were made up of about half regulars, half replacements.

Same went for ZR. Got all the frogs down and only had 35 marduk body to show for it (congrats Airy!).

I mostly organized these runs to see if I could actually run them and get the right pieces together. I've been doing salvage with Ring/Omoi, Cel/Blaize for nearly 8 months now and knowing how people tend to burn out, I figured it would be nice to help run one of these things from time to time and just let the normal leaders show up and mash shit. I'm still missing a few key details for each zone, but I feel like I'm in decent enough position with ZR, SSR and Arrapago that I can step in from time to time if necessary. Bhaflau I haven't really paid much attention to since I mostly get parked in a room while everything is pulled to me for me to stab...so I'll have to read up on that one a little further before I even attempt to run that.

Very special thanks to Cel, Blaize, Izman, Kay, Airy, Rifu, and Milie for helping me get these runs off the ground without a hitch. I appreciate it.

ANNM

Had the itch to go play with these a bit over the weekend too. These are a lot of fun, but can eat up Allied Notes in a hurry. The good thing about most of these is that it doesn't take a full alliance to go kill 'em. Generally a solid party will be sufficient enough. We went Sunday and Monday with some decent drops showing up each time. Canuck ended up walking away with the best drop in the form of an Imp. Wootz Ingot while most of the others got something like a divine log in terms of value.

Doing these once/week might be feasible, but I can see how it would be difficult to maintain unless you made a very specific point of doing 7.5k worth of campaign each week.

Speaking of...

Campaign

God this bores me to tears anymore. I forced myself to do this over the weekend until I got my Wings of Honor back. Much to my surprise, I had more fun messing around as PLD/WHM than I did DRG/WHM. Long story short...I got my Wings back and now I hope just spamming my 7 op tags a couple weeks in a row will be enough for me to maintain my rank.

Skill Up

Why the hell does PLD have so many damn weapons they're proficient at? I have issues when I look at my various skill levels and don't see a blue number. I bought up a Mercurial Sword and went to town on skilling up Great Sword. I went from 102-250 in about 6 hours of total skill up. Gotta love multi hit weapons and the new signet effect. There really isn't an excuse anymore other than sheer lack of time to not have your main skills capped. Next up is Club, Staff and Dagger...

That list of mine is getting shorter and shorter...soon I'll start the Dark Knight leveling. :)

Friday, May 22, 2009

It's Friday and I Haven't Old Man Ranted In A While...

...I figure it's time to do what this blog advertises itself to do in order to give everyone a break from the numbers crunching I've been doing lately.

Old Man Rant!

Before the rant though, I do want to say that all the math and gear posts that I've been making lately are leading to the debut of something I've started working on. I'm unsure when it will debut, but it will be something that will make lives a lot easier when it comes to picking out gear sets for Dragoon.

Onto the rant.

If you read this blog post, you've got a pretty good idea where I stand on a number of leadership issues and how I go about preparing for an event. This should translate into how I tend to judge others. In dealing with people, I look at level of committment, selfishness and consideration of others. All t hree of these things go hand in hand.

Selfish Acts vs. Selfish People

Selfishness Defined

This word gets tossed around a lot and the vast majority of the time, it doesn't apply to the person as a whole. There are selfish acts and there are selfish people. Before I go further, here's what dictionary.com has to say about the definition of selfish:
  1. devoted to or caring only for oneself; concerned primarily with one's own interests, benefits, welfare, etc., regardless of others.
  2. characterized by or manifesting concern or care only for oneself: selfish motives.

These things happen every day. Everyone has them on a daily basis. In the world of FFXI, everyone has SOME reason why they do something and the majority of the time, these are selfish reasons. There are good and bad reasons for them. A team member that's been burned by a selfish act has to have the ability to look outside the the act itself and determine if it's a pattern.

What I see happen a lot is one person will get burned and label someone as selfish. Did the person who got burned stop to think perhaps they feel burned because they didn't get what they wanted? What was their reason for teaming up with said person? To gain something, right? Most people usually aren't teaming up with someone else unless it's to further themselves. Hell, even writing this blog has selfish motivations behind it. It's something I want to do, right?

Understanding that everyone has selfish motivations will weed out the people from the acts. Everyone is allowed to be selfish about things as it's just simply human nature. Maintaining a balance by performing unselfish acts will help separate the people from the acts as well. How do you go about this?

In FFXI terms, go do something with a buddy without qualifying it with phrases like:

"My DRK needs a buffer anyway..."
"Oh I can skill up my great sword!"
"I'd like a shot at a macha's coat, so I'll help."

A truly selfish person is incapable of thinking along these lines. Any offer that comes their way is immediately followed with the thought of "How does this benefit me?" If no answer comes to mind, they'll go do something that does benefit them or give some lame excuse like all of a sudden having some homework for school just mysteriously appear despite the fact they were wasting a bunch of time in game to begin with.

Commitments: Making Them and Breaking Them

Commitments are the cornerstones of friendship and relationships. Making a commitment to someone means you're the one they're going to rely on for help. When I make a commitment to someone in game, I'm there unless something like work or family emergencies prevent me from keeping it.

All too often nowadays, people fail to understand this most basic concept. It isn't hard to follow a simple thought process before saying "Yes" and commiting yourself. Ask...

Do I have any other commitments I've made? If Yes, say No. Double and Triple check your schedule if you have to. Don't commit yourself to too many things at once. This is easily the biggest reason people break commitments. They forget about ones they've already made and they also don't take into consideration the standard commitments that are built into their daily routines like...when they go to bed.

If I don't, is this something I want to do? Honesty is the best policy here. If you don't want to do something, then just say so. Don't commit yourself to something you don't want to do, then conveniently not be logged in...

Not so hard to figure out is it?

Breaking a commitment will usually lead to selfish accusations. Some of them are completely true and some are spoken purely out of anger because the accuser didn't get something they wanted. A good in game example that I run into more often times than not is...

Someone breaking a commitment to an event I'm organizing to do it with someone else. This will piss me off to no end. Does that make me selfish? Depends on why you think I'm pissed.

  • Am I pissed because I didn't get a chance at an item?
  • Am I pissed because I have to find a replacement for you?
  • Am I pissed because I have a team of people with their eyes on me waiting for me to fix a mess you made?
  • Am I pissed because I'm the one that has to answer to this team's disappointment if I'm unable to get the event off the ground due to your selfish behavior?
  • Am I pissed because the rest of the team doesn't get a chance at stuff they want?
  • Am I pissed because I trusted you would be there and you broke my trust?
  • Am I pissed because you thought more of your own chances to get what you wanted instead of honoring your previous commitment?
  • Am I pissed because I spent lots of time preparing and organizing only to have to do most of it all over again?

The list goes on and on. I can tell you the answer pretty quickly. Items are something that come along in the natural course of gameplay. Obviously those chances can be few and far between and it's only natural for that to play into the anger towards a broken commitment, but don't fool yourself into thinking it's the only reason. The ramifications of that poor decision on your part will manifest themselves at a later time and you will have bridges to rebuild.

Consideration of Others: It Takes Two to Tango and Six or More for Everything Else in FFXI.

And here we find ourselves at the crown jewel of my rant today.

By it's very definition, "selfishness" is lack of consideration for others.

By it's very definition, "commitment" is consideration for others.

The world revolves around this concept. There are a million different ways you can take your teammates into consideration, but I'm going to focus only on a few as it pertains to FFXI.
  • Prepared. This means lots of things like going to get maps. Researching what you're about to fight. Bringing appropriate items. Coming to an event completely unprepared causes a strain on the rest of your teammates.
  • Honoring commitments. You do your teammates no favors by overbooking yourself or by leading them to believe you'll be there and not be.
  • Working until your team has earned the same share of loot as you. Too often we end up seeing people organize something, get the first drop, then don't bother to help the guys that helped them. To me, asking someone to help you with something commits me to help them get something they want.
  • Cowardice serves no purpose to your teammates in any capacity. Voicing your opinions through someone else, manipulating rules to skew them in favor of yourself or a loved one/significant other, or imposing your beliefs/morals, likes/dislikes on everyone, just tears the fabric of a team apart. Being human about things goes a long way towards building and maintaining chemistry. The vast majority of people have the capacity to talk about things rationally, but if you approach a situation in a completely non-compromising fashion, you can't be shocked to learn that a compromise won't happen. This, again, leads to a sheer lack of consideration towards your teammates.

It's not easy to take everything into consideration when it comes to planning an event. I'm the first one to admit I can't do it and I rely heavily on my teammates to tell me what I'm not taking into consideration.

Conclusion

These three things tell more about you as a person than any thing else you can possibly do. We can go into a little more detail by rating how good a cause is for something you're commited to or we could list various other things that show just how considerate you are of others. Too often, I see members of the linkshells I've run put themselves above the linkshell and cost people a lot of time and energy. Too often, I see leaders I've been associated with through various means become drunk with power and be unable to to tell the difference between expressing their opinions just so they can satisfy their own ego by reading over their own creations and expressing their opinions to actually try to work towards a better group. Too often, I've seen people, leaders and members, alike become so obsessed with one item, one person, or one grudge that any form of rationale escapes them.

If people would take one second to think of the other people a decision they make will effect, things become a lot happier in the end.

Thursday, May 21, 2009

Yet another Math lesson...Weapon Skills.

For this post, I'm going to go over the formula for calculating weapon skill damage. There are two different types of weapon skills. They are physical and magical. Dragoon's most common weapon skills that are used are Drakesbane, Penta Thrust, and Wheeling Thrust. Later in this post, I will break down each weapon skill based on their modifiers. Again, for starters, let's look at my gear for weapon skills.

Weapon: Gungnir
Grip: Pole Grip
Ammo: Olibanum Sachet
Head: Askar Zucchetto
Neck: Love Torque
Ear1: Brutal Earring
Ear2: Bushinomimi
Body: Ares Cuirass
Hands: Hecatomb Mittens
Ring1: Flame Ring
Ring2: Rajas Ring
Back: Amemet Mantle+1
Waist: Warwolf Belt
Legs: Conte Cosciales
Feet: Hecatomb Leggings

The relevant totals for this gear set:

STR: 80+53
DEX: 62+26
Acc: +20
Polearm skill: +7
Att: +46

The target is yet again our level 82 Greater Colibri (340 evasion, 69 VIT, 330 defense).

The relevant information that we already covered recalculate for this set (WS total(TP total)):

fSTR: 17(10.25)
cRatio: 1.25(1.17)
pDIF Minimum: 1.25(1.05)
pDIF Maximum: 1.86(1.64)
fMIN: 183(144)
fMAX: 271(226)
Accuracy %: 89.5%(95%)

(pDIF values determined by using 527 attack vs 330 defense)
(fMIN/fMAX numbers include 25% piercing bonus to our target)

What a difference STR makes eh? Now for the equation:

Damage = WD * pDIF

...wut?

Based on what we already know from above, the equation looks like this:

Damage = WD * 1.86

That doesn't leave much to figure out. Or does it? Let's define the parts we'll need to know.

Damage: Self-explanatory. The end result of all that number crunching.

fTP: TP multplier. This applies specifically to your first hit (if it's a multi-hit skill). This is going to be different based on the various weapon skills we use. Breaking this down to the commonly used Dragoon weapon skills:


  • Penta Thrust: fTP is 1 across the board.
  • Drakesbane: fTP is 1 across the board.
  • Wheeling Thrust: fTP is 1.5 across the board.
If you're noticing a pattern here, then notice your fTP never changes unless the TP anchors change. What's a "TP anchor"? It's the modifier that's present at 100TP, 200TP and 300TP. What happens if you have different anchor values? Well the formula looks like this:

fTP = (Previous Anchor) + (dTP * ((Next Anchor) - (Previous Anchor)))

Guh...STOP IT Q!

dTP: is simple to figure out here. It's basically the percentage difference between your current TP and the previous TP anchor. In other words, if you have 187TP, your dTP would be 8% or .87 for our equation's purpose. Now to put it in proper perspective:

Impulse Drive has TP modifiers of 1.0, 1.5 and 2.5. If you have 187TP, the formula looks like this:

fTP = 1 + (.87 * (1.5 - 1))

This gives us an fTP of 1.44.

Only use this equation if the amount of TP you have actually changes your TP Modifier.

WD: This number is the base damage of your weapon skill. It's calculated by using the following formula:

WD = (D + fSTR + WSC) * fTP

So how we see just how much that STR rating effects everything. We also see we have to learn another equation to figure out wtf WSC is..

WSC is where all those Attribute modifiers come into play. The equation itself can change based on how many of your attributes are taken into account for modification. If you're just calculating Drakesbane for example, then we know 50% of our STR goes into the WSC equation. The WSC equation would look like this:

WSC = floor(floor(A * A%) * α)

We know my STR is 133 and we know Drakesbane has a modifier of 50%. Our equation looks like this now:

WSC = floor(floor(133 * 50%) * α)

Ok, what's "α"?

And what's "floor"?

"α" represents a value that scales down your WSC value as you level up. A level 75 character's "α" value would be .83.

"Floor" means take the value inside the parenthesis set it's in front of and drop everything after the decimal point.

WSC = floor(floor(133 * .50) * .83)
WSC = floor(66 * .83)
WSC = 54

OK GODDAMN STOP IT!

Not yet, back to our WD value for Drakesbane...

WD = (D + fSTR + WSC) * fTP
WD = (100 + 17 + 54) * 1.0
WD = 171

And now back to our main equation...

We last left it here using our max pDIF value:

Damage = WD * 1.86

Maximum damage/hit:

Damage = 171 * 1.86
maxDamage/hit = 318

Minimum damage/hit (using our bottom pDIF value):

Damage = 171 * 1.25
minDamage/hit = 213.

So Drakesbane for me, w/o any crit, double attacks, or buffs and landing all 4 hits, will do anywhere from 852 - 1272 points of damage.

For Penta Thrust? It's WSC value with my set up ends up being 35 compared to Drakesbane's 54. This makes it's WD value 152 as opposed to Drakesbane's 171. There is an extra hit in Penta Thrust though, so don't take those values as Penta Thrust being a lot weaker. If conditions are the same as above and all 5 hits land, my damage range will end up being 950 - 1413.

There's the caveat though. Do you try to reach the 95% acc ceiling with gear and maximize your chances of landing all 5 Penta Thrust hits or do you load up on a little more DEX and try to cap out your chance of landing critical hits with Drakesbane. Penta Thrust's TP modifier is accuracy and Drakesbane's is chance of landing critical hits. From personal experience, my highest WS on Greater Colibri was done with Drakesbane, but end up all over the map from a damage standpoint and Penta Thrust ends up being a lot more consistent.

What about Wheeling Thrust? How the hell does that work? This is yet another Dragoon weapon skill with a constant fTP and a TP modifier that's almost impossible to measure in the form of "Amount of defense ignored varies by TP". Pretty much all of our numbers will change when trying to figure this out, so I'll spare you the details of the math and just give you the essentials:

100TP: 20% ignored defense (Colibri defense = 264).

fSTR: 17
cRatio: 1.65
pDIF Minimum: 2.44
pDIF Maximum: 3.28
fMIN: 356
fMAX: 478
Accuracy %: 89.5%
WSC: 54
WD: 299

Minimum damage no buffs: 729
Maximum damage no buffs: 980.

This assumes my defense ignored amount is correct. I strongly suspect it's not, but it was just an easier number to plug in. It could take some testing, but regardless, you can easily see what Wheeling Thrust is capable of on Greater Colibri if this is true.

Conclusion

So what's better for weapon skills? Loading up on STR? Loading up on Attack? Loading up on Acc? I think a lot of that depends on your race for starters. There are caps to things such as fSTR and Acc, so being aware of where you're at in relation to those caps will help make those decisions better, but there are not caps on values effecting things like WSC.

Generally speaking, if you're comfortable being around the 80-85% mark for your accuracy, you can load up on some attribute heavy gear and go to town. In Dragoon's case, it's all about the STR as it effects damn near everything we do. Loading up on attack+ gear has the potential to outdo a piece of gear that has +STR as it's only stat, but do not forget that adding STR adds attack as well and at that point, it becomes a trade off based on what weapon skill you're using or if you're looking to try to up your DoT average.

Again, I've probably f***ed up some things here trying to put all the math in together in one place so please do not take these posts as anything other than a very general framework with which to work in while playing Dragoon.

Wednesday, May 20, 2009

DAMN IT SE! I'M A DRAGOON, NOT A MATHEMATICIAN!

This serves as your warning. The details that follow this opening paragraph hurt my head. I can only imagine it will hurt yours as well, but I'm going to go through the pain in order to demonstrate what gear is best overall for TP gain and WS damage. I'm posting this information as a precursor to the equipment details I plan on posting in the next few days. This information also relates to mainly to any job that uses a 2H weapon. I wiil not be getting into the detail of ranged attack or one-handed weapons.

Before we get started, here is my TP gear:

Weapon: Gungnir
Sub: Pole Grip
Ammo: Olibanum Sachet
Head: Askar Zucchetto
Neck: Love Torque
Ear1: Brutal Earring
Ear2: Ethereal Earring
Body: Ares Cuirass
Hands: Homam Manopolas
Ring1: Ulthalam's Ring
Ring2: Rajas Ring
Ring3: Old man
Back: Amemet Mantle+1
Waist: Swift Belt
Legs: Homam Cosciales
Feet: Homam Gambieras
Food: Spaghetti Carbonara


First, the main equation.

(D+fSTR)*pDIF

This equation is what's widely accepted as the formula for calculating your attack damage. This equation also has several mini-equations built into it and you cannot expect a constant number for any piece of it except D.

D = Your current weapon's base damage rating. In my case, Gungnir has a base damage rating of 100.

(100+fSTR)*pDIF.

fSTR = Your STR against a target's VIT. Information about your target's VIT isn't something you're going to usually know off the top of your head, but through extensive testing, you can usually pick up a range. For this blog's purpose, we're going to play with Greater Colibri, who have been found to have a VIT range of 67-69.

The formula for figuring this piece out is (STR-mob'sVIT+4)/4. My understanding is that 4 is the accepted number for increasing your fSTR rating. In my normal TP/Food set up, my STR rating is 80+26. If I'm fighting Greater Colibri, we'll figure this up on the high side of their VIT range and the equation comes out to be (106-69+4)/4. Which = 10.25.

fSTR = 10.25

So now we're at:

(100+10.25)*pDIF

pDIF = Your attack rating against a monster's defense rating. It's all about a ratio. There are different formulas for melee and ranged attack ratios. We'll stick with the melee ratio since Dragoons do not have any hope of ranged attacks.

For starters, we need to figure out the level correction portion of this. Greater Colibri are level 81-82. We obviously are not higher than 75. The correction that comes into play is as follows:

cRatio = Ratio - .05 * level difference

If your base attack is 500 and your target's defense is 500, then your Ratio = 1. In situations where your Ratio = 1, your cRation for fighting a level 82 monster is calculated like this

cRatio = 1 -(.05*7.)

Or...cRatio= .65.

It's not always this simple though. Assuming nothing like Angon or Dia have been dumped onto the Greater Colibri, it's reported their base defense is between 320-330. For our purpose, we'll just say 330. Now your Ratio looks like 500/330. This calculates out to a 1.52 ratio and our formula now looks like this:

cRatio = 1.52-(.05*7)

cRatio = 1.17

The cRatio dumps itself into two formulas to calculate the max and min borders for your damage range. These formulas are not entirely accurate for two-handed weapons since the update, but they serve as a good general framework. These formulas are:

Max pDIF

fMax(cRatio) = .04+ (1.2 x cRatio) (Use this one if your cRatio is between 0 and .5.)
fMax(cRatio) = 1 (Use this if your cRatio is between .501 and .833.)
fMax(cRatio) = 1.2 x cRatio (Use this if your cRatio is between .833 and 2.)

Since my cRatio is 1.17, we'll use the last equation and determine my Max pDIF is 1.64 in TP gear.

fMax(1.17) = 1.2 * 1.17.
fMax(1.17)= 1.40
1.40(1.17) = 1.638 (1.64 rounded up)
fMax = 1.64.

Min pDIF

fMin(cRatio) = -0.5 + 1.2 x cRatio (Use this if your cRatio is between 0 and 1.25.)
fMin(cRatio) = 1 (Use this if your cRatio is between 1.26 and 1.5.)
fMin(cRatio) = -0.8 + 1.2 x cRatio (Use this if your cRatio is between 1.51 and 2.)

My cRatio of 1.17 puts me in the first range and gives me the following equation with my numbers plugged in.

fMin(1.17) = -0.5 + (1.2 * 1.17)
fMin(1.17) = -0.5 + (1.40)
fMin(1.17) = 0.9
0.9(1.17) = 1.05
fMin = 1.05.

Understanding how pDIF works takes understanding that with each swing you take, the pDIF value is randomly generated between your fMin and fMax values.

Ok, got all that? Time to put it together after a short review.


Base weapon damage = 100
fSTR = 10.25
pDIF range = 1.05 to 1.64.

Using those numbers and throwing out the 25% damage bonus a Greater Colibri takes from piercing weapons, we see that my base normal swing damage will be 115 (min = (100+10.25)*1.05)) and my max will be 181 (max = (100+10.25)*1.64. Putting the damage bonus in, we get:

min = (115*.25)+115
max = (181*.25)+181

min = 144 damage
max = 226 damage

That's a lot of math. Now knowing the equations themselves, here are the max and minimum ranges for each of the stats.


  • fSTR has a cap of 18. Allegedly this cap is 19 with a relic weapon.
  • cRatio has a minimum of 0.
  • cRatio has a max of 2.
  • When Critical hits occur, your pDIF is raised by a value of 1, but that's another issue for another section.

Second part is understanding the effects of bonuses such as Haste, Double Attack, Attack and Accuracy and Store TP (in order of importance).

Accuracy

Put simply, this is your chance to hit and it caps at 95%. Your accuracy is determined by the following equation (rounded down):

Acc = (Combat Skill + DEX + Equipment + Traits + Abilities)

This is easily the most important thing to cap in a TP set. Gear can be traded off if you're in the neighborhood of this 95% cap, but understand that you will not always be capped or close to capped in most situations with just gear and food alone. At that point, a trade off between Accuracy and some other bonuses comes into play depending on the availability of bards or corsairs.

My TP set gives the following as it relates to determing your Accuracy rating:

Accuracy + 40
DEX + 14
Combat Skill + 7

My natural job traits and merits add the following to this equation:

Combat Skill: 292 (capped polearm skill + 8 merits)
Base DEX: 62
Job Trait: Accuracy Bonus II (+22 Accuracy)

Before calculating, we need to do two other things. The first is determine what our accuracy score is from our DEX. Accuracy value from DEX is determined by (DEX*0.75). Second is to adjust the accuracy value from our combat skill. Anything over 200 is adjusted by a value of 0.9. In my case, it's (200+(99*0.9))

DEX Acc value = +57
Combat Skill adjusted value = +289

Plugging these into the equation above, we get:

Accuracy = (289 + 57 + 40 + 0 + 22 + 0).
Accuracy = 408

Food is added on top of your Accuracy value after all other modifiers from abilities, songs, etc have been added.

Now how do you determine if you've hit the 95% mark? Well that's where you take your accuracy value and put it up against your target's evasion. If (your accuracy) = (target's evasion) then your hit rate has a base of 75%. For every 1 point of accuracy you add over your target's evasion, you increase your chance of landing the hit by 0.5%. In other words, it would take +10 accuracy to increase your chance of hitting by 5%.

There is also a penalty or bonus to take into consideration for level gaps as well. You lose 4 accuracy points for every level you're below your target and you gain 4 accuracy points for every level a target is below you. Knowing your target's level range will help you tremendously in determining what food to take.

In the case of our level 82 Greater Colibri, it has a base evasion of 340ish (using 340 just cause it's even and probably pretty close to reality). First figure up your accuracy penalty.

Acc penalty = 4 * 7.
Acc penalty = -28

Now my number looks like this:

380 against 340.

In order to reach the 95% cap, remember every +10 accuracy means a 5% boost to your hit percentage. In order for me to hit this cap, I need to be at +40 over the Greater Colibri's evasion, which I am and that means I don't have to eat sushi, I can eat meat w/o having to worry about a loss. Remember a normal melee hit will ALWAYS outdamage any bonus food can give you. Cap this and build from there.

Haste

Haste is not something to be overlooked in any way, shape or form. Put simply, haste is a reduction in your weapon delay. If you reach the Haste cap of 80% for example (which you won't as DRG...), it means your weapon delay has an 80% reduction. A delay of 492 turns into an effective delay of 99.

As Dragoon, I have a TP set that gives me 17% haste. Dragoon can reach the gear haste cap of 25% through a lot of money and a lot of luck. The pieces I wear with haste on them are:

Askar Zucchetto +4%
Swift Belt +4%
Homam Gambieras +3%
Homam Cosciales +3%
Homam Manopolas +3%

In order to reach the haste cap for gear, you need the following:

Speed/Velocious Belt +6%
Walahra Turban +5%
Wyrm Mail +1 +2%
Sword Strap +3% (remember it's not a literal 3% haste, but is the same basic effect and will reduce your TP/swing)
Homam Cosciales +3%
Homam Manopolas +3%
Homam Gambieras +3%

Understanding that SE actually did us a favor by making it easy to calculate weapon delay, we can easily figure out just how much Haste will effect the overall output. Weapon Delay is best explained by saying that for every 60 delay, there is 1 second between attack rounds. With most polearms a Dragoon uses at level 75, there is a delay of 492 on them.

Weapon Delay/60 = time (in seconds) between attack rounds.

So in my case, having no haste on at all result in having 8.2 seconds between rounds or 7.5 attack rounds per minute. Follow the second hand on a clock for 8 seconds and see what happens. Feels like an eternity doesn't it? Using this information with my fMin and fMax numbers, we can see that I'll end up doing 1080 points of damage per minute minimum and 1695 points of damage per minute maximum. Keep these numbers in mind and watch what happens as we stack on haste. Remember the spell Haste adds 15%.

These numbers represent DPM with my current TP gear (cDPM), current TP gear with haste cast on me (cDPMh), and finally current TP gear with max magical haste effects from spells (43%, cDPMhm).


DPM: 1080-1695. 8.2 seconds between attacks, 7.5 attacks/minute, 492 delay, 0% haste
cDPM: - 1267-1989. 6.8 seconds between attacks, 8.8 attacks/minute, 409 delay, 17% haste(17% gear haste).
cDPMh: - 1542-2420. 5.6 seconds between attacks, 10.71 attacks/minute, 335 delay, 32% haste (17% gear, 15% magic).
cDPMhm: - 2617-4108. 3.3 seconds between attacks, 18.18 attacks/minute, 197 delay, 60% haste (17% gear, 43% magic).

Obviously, the faster you swing, the more damage you do, but most people underestimate the importance of this and often times will sacrifice a haste piece in favor of a Double Attack or +attack piece. It needs to be something pretty drastic to change out a haste piece in my opinion.

Store TP

Another primary goal for Dragoon is to put together a 5-6 hit TP build. What this means is, through your gear, food and subjob choices, you need to have 100 TP in 5-6 hits not including your jumps. This assumes your weapon skills land as well. Learning how Store TP works requires learning a couple other things first.

Base TP/swing is calculated based on your weapon delay. Since my weapon delay is 492, my formula looks like this:

13.0 + [(Delay - 480) * 1.5 / 50]

Or

13.0 + [(12) * 1.5/50]

My TP per swing with no bonuses ends up being 13.36/swing. There is no rounding down or up with SE's calculations of this, it's just flat truncated after the first decimal place, so it's 13.3/swing.

Second, you need to understand that Store TP is a % increase, not a straight up addition to your TP/swing. In other words, if you have a piece of gear that's Store TP+10, it's adding 10% of your TP (total 14.63 of my base) and not literally 10TP to my base (23.3...).

So if our base TP/swing is 13.3, we can easily do some math to see that we need 7.5 swings to reach 100TP from 0TP. Depending on your TP return from the WS you're using (let's say 15 return TP from a no-buffed, full hit Drakesbane), then we need 6.4 swings to reach our next 100TP. That means we do not have to add much for our 6-hit build. In my TP set, using Carbonara as food and subbing SAM, I have Store TP+25. This works out to the following:

(13.3 * 0.25) + 13.3 = 16.6 TP/swing, which puts me just over a true 6 hit build at 6.02 swings/100TP (if starting at 0TP). Using this information in combination with the Haste cDPMh above, I'll be able to WS approx every 25-30 seconds.


Double Attack

Double Attack is a bit of an enigma for people to understand. Obviously on it's surface, people see "2 attacks/round > 1 attack/round" and obviously, that would be true. However, people need to understand that having something like "Double Attack + 5%" only increases the chance Double Attack will proc on that particular attack round. It is not a constant like Haste.

In my standard TP set up, I have +7% Double Attack. For the sake of this blog post, we'll assume that Double Attack will actually process 7% of the time. This means after 100 attack rounds, I will have picked up 7 additional swings.

Using my fMin and fMax values from above, this means I will have dumped out a minimum of 1008 damage (144*7) and a max of 1582 (226*7) and I will also have gained enough TP to dump a weapon skill.

This trait should be treated as a bonus and only used if it's included with a piece of gear that you would use anyway. Wearing something other than a Pole Grip or Brutal Earring purely for Double Attack will likely result in a far smaller DPM rating.

Putting it all together

Quick review of the important information:

Target: Level 82 Greater Colibri

pDIF range = 1.05 to 1.64.
fMin: 144
fMax: 226
Accuracy %: 95% (380 vs. 340 acc)
cDPMh: - 1542-2420. 5.6 seconds between attacks, 10.71 attacks/minute, 335 delay, 32% haste (17% gear, 15% magic).
TP/hit: 16.6
Double Attack: 7%

Taking everything here at it's literal meaning, over a two hour xp session on these birds will mean the following if there is no down time from being disengaged, no mobs, etc and assuming I'm NOT using weapon skills:

Total number of basic swings (w/o double attack): 1285
Total number of double attacks (7%): 90
Total number of swings: 1375
Total number of hits (95% acc): 1306
Total minimum damage: 188, 064
Total maximum damage: 295,156

And just for comparison...Valkyrie's Fork with rest of set up the same.

Total number of basic swings (w/o double attack): 1285
Total number of double attacks (10%): 128
Total number of swings: 1413
Total number of hits (85% acc): 1201
Total minimum damage: 153,728
Total maximum damage: 241,201

Conclusion

It's important to remember that I figured these numbers at literal percentages and could be off. I may also have screwed up some calculations somewhere, but the important thing to take from this post (aside from it being very long) is the general framework that a Dragoon operates in when it comes to basic weapon attacks and how to get the most from them. Feel free to post if I messed up somewhere and I will correct it.


Coming Soon:

Gungnir vs. Valkyrie's Fork - A Closer Look At How Gungnir Can Be Beaten.

(Or at least kept up with...)


Monday, May 18, 2009

We interrupt our normally scheduled Dragoon lesson for...

...nothing really.

I was going to continue my Dragoon series this morning, but I figured I would just update what I did over the weekend instead.

Einherjar

Relatively easy T3 run this past Saturday. Normally when we do T3, we run into Behemoth, Cerberus, Hydra or Vampyr for our boss. We got Khimaira for this run. I decided to tweak our boss fighting strat out a bit for this run based on a conversation with Cdgreg a couple days prior to that. Greg's group apparently has similar luck in regards to which bosses show up. In the midst of their run, I was asked about how we handle Khimaira and I really didn't have much of an answer. I knew he was considered one of the easier T3 bosses, but I couldn't recall if he was Chainspell-stunnable (since he's thunder based) and I knew Fulmination and Tenebrous Mist could make for some bad situations. So after not really suggesting anything at all to him...he came to the conclusion to whittle it down slowly to 40-50%, then CS-Stun/zerg him down the rest of the way.

This caused a light bulb to come on for a subject that had been bothering me for a while in regards to Einherjar, but not enough to make me go and research it extensively. I've said before in my various musings about Obsidian's membership that we're made up of the casual player. From a damage dumping standpoint, we've got maybe...10-15 people that can dump out some very high numbers in a very short period of time. Catching all 10-15 of these guys in the same run is rare and you can usually tell if they're there by how fast a boss drops down. The rest of our member base is generally average.

There's nothing wrong with average btw. Sitting in my position, I have to be aware of these things so I can build strats around it. I don't judge membership status to any shell I've been part of by how 1337 your gear is. Again...if I'm not willing to teach, I have no room to bitch. If I see a number of people in a run that I know or aren't sure if they're capable of dumping out the super high numbers, I'll often times put in an extra healer to extend our MP pool while they do what damage they can.

The last T3 we did prior to this one we ended up losing with Cerberus at 1%. We had plenty of time to take him down, but status effects removal killed us. This also showed a similar pattern that we find ourselves in. Normally when we fight a boss on any tier, we have no issues getting it down to 10-20% HP in a hurry. It's that last push that usually drags on for ages as our two hours start to wear off. This HP% is also the most dangerous part of a boss...especially the T3 ones. So after that conversation with Greg and then remembering this pattern that happens, I decided to change when our RDM/DRKs started the CS stun process. I felt like we didn't need to wait until 40% to start it as we generally go in with a full load of people. I had our RDM/DRKs start the stunning process on Khimaira at 50-60%. For the most part, it seemed like it paid off well for us. Boss was downed in less than 2 minutes and only one Tenebrous Mist got off. I know most bosses aren't CS stunnable, but keeping this in mind for the ones that are, I may be able to get around that sludgey part of our boss fights.

Dynamis

I haven't been to dynamis in a while due to work and vacation. Yesterday marked my return after missing about a month's worth. This also marked the debut of my Paladin in dynamis.

For those of you that don't know...I won Hauteclaire in Mog Bonanza last year. Apparently, it suffers from the same shape-shifting disorder that Gungnir does. Note how insanely huge it looks at the apex of /hurray. Anyway, I haven't bothered to research gear for this job yet as most of the stuff I have is probably better than average. Few pieces like back, waist, ranged and probably rings/earrings need to be picked up, but other than that, I think it's mostly done. Tanking is generally something that's usually an issue with Dynamis. I'm not sure how to go about training someone in a more efficient way other than just beating the kill orders into their heads. To me, tanking in dynamis is more about pointing your alliance in the direction it needs to go than it is about taking a beating and holding hate. This entails knowing the kill order and the strats like the back of your hand.

I found tanking to be relatively easy in Windurst. I need to work on my timing when I switch from beast to beast though. I found I was often way ahead of my original target's death and often soloing monsters. Not that they did anything super strong to me that put me even in the most remote bit of danger, but it makes it hard on mages if multiple targets are being fought and one of 'em happens to be an over-zealous Dragoon in a Paladin's body trying to solo one. I also need to figure out Atonement timing along with a good enmity build.

This is from one of two wipes we had, both of which occurred from some slighty over-zealous Kimille pulling. I know membership pays for the whole training thing, but aside from very few moments like this, Kimille has worked out very nicely as a sackholder. Pulling mistakes are not all that uncommon as it seems like the game's linking system is hit or miss. Terrieberrie paid the price for this one though. This is probably karma paying Terrieberrie back for making me miss a teabag attempt on him a couple days prior to this. YOU CAN NEVER ESCAPE THE TEABAGS.

Obsidian's sack system has been kind of weak as of late as well. We've got 2-3 sacks that are generally there at every run and available with enough time before a run starts to do some of the admin stuff. We've got 3-4 that are generally there at every run, but aren't able to do any of the admin stuff for various reasons that range from other committments (i.e. work or in-game) to no website access while FFXI is running. Then we have a couple who are barely around at all due to some heavy real life committments.

I know part of my judgement of these guys goes hand in hand with what I prefer to do when preparing for a run. I prefer for parties to be posted at least an hour before the run starts to give enough of a heads up to people who might have to change jobs. I prefer for bidding to be taken care of 20-30 minutes before the start of a run as I view being able to bid on open items as a privilege for early arrivers. I prefer for a run to be "finished" as soon as it ends with results posted shortly afterwards. I prefer for every sack to be able to do any admin task from building parties to pulling.

Most of those preferences are born of my dealings with our memberbase over the years. I know the other sacks are not me, but there has to be a large degree of consistency in the crew of sackholders in order for the member base to be consistent as well and this is something I'm simply not seeing. I'm not unhappy at all with the crew we have as we currently have some of the most patient and understanding people we've ever had in the sackholder crew, but the lack of consistency lately is frustrating at times. Lack of consistency = /tells I don't want to get.

I hate coming off as being the main guy in Obsidian more than anything else though. I'm certainly known for having no fear in expressing my opinions and expressing them frequently in long-winded manners. That adds to the perception I'm the "figurehead" of the linkshell. I'm also one of maybe...8 people(?) left from the linkshell's origins. Long tenure + vocal opinions = figurehead perception. It couldn't be further from the truth. I've always considered myself equal to anyone else that was promoted to a sack and often times defer questions related to various admin duties performed to the sacks that performed them so that I don't give the impression of stepping on toes.

Sarameya

This was something I was invited to help kill by Omoikitte. Apprently they needed a rusty ass White Mage that just happened to have AF2 britches, Blessed Body and a fully merited Shellra V and Regen. I hadn't done anything serious on White Mage probably since I started up Einherjar with Obsidian last August, so needless to say...

...I needed the rust to come off quick.

The general strat used here was the one Kaeko had detailed here. Kaeko's strat outlines using a PLD/DRK, SAM/WAR, WHM/BLM, SCH/RDM, BRD/WHM and RDM/WHM. Both the PLD and the SAM had fire resist sets. Our set up was:

Party 1

PLD/RDM (Inbred)
SAM/WAR (Old Man)
SAM/WAR (Ingot Hoarder Smithiroon)
BRD/WHM (Tentacle)
RDM/WHM ({Nice to meet you} :)™)
WHM/BLM (Me)

Party 2

SMN/WHM (Acacia)
THF/NIN (TH-100)

This was definitely a learning experience. We didn't win and there are several reasons being floated as to why. Blaize probably has the most solid reasoning as to why we weren't winning in that he believes a third melee subbing SAM (namely Izman as WAR/SAM) with a fire resist set will help tremendously for bouncing hate and keeping hate under control when it's reset. The vast majority of our issues came along when he was in Gates of Hades mode.

There's also the thought process that instead of another melee, we should have had another healer. Having Iz go as WAR/SAM and Ring come as WHM/BLM probably would have went a long way as well.

Both thought processes lead to one conclusion though:

Need to extend our MP Pool.

There's part of me that blames my rusty White Mage skills, but as the fights wore on, that got knocked off and it came down more to what I felt was our inability to control hate. Aside from this, a few other bullet point observations:

  • Sarameya's hate is not party or alliance shared. You can sac this easily to buy time w/o having to worry about disbanding from your party.
  • Kaeko's strat outlines the SAM's having a defense down set for those moments when Third Eye goes to shit. We were missing said set on our SAMs.
  • Kaeko's strat also outlines the SAM swapping weapons quite a bit as he moves from set to set.
  • I wasn't as impressed with Seigan/Third Eye as Kaeko was. If hate is constantly bouncing and you get the 2-3 anticipates per Third Eye that Blaize suspects we'd get, it'll be fine, but you need more than 2 Third Eye tanks due to the speed of the attacks.
  • Atonement wasn't very strong against him.
  • Blood tanking sucked the MP right out of our collective MP pool. Kaeko's party set up allowed for 2 main healers essentially whereas we had one main healer, one main dispeller, a bard and 2 make-shift healers in the form of a SMN and a PLD.
  • The actual timing of when hate resets after the howling sequence left us a little confused. This was the biggest reason we had hate issues. There doesn't appear to be a set part where the hate actually resets. It seems like it can do it anywhere from the time Magma Hoplon finishes to the time the howl animation finishes.
  • Regen III fully merited and AF2 body negated most of the poison effect. Only problem is that Regen III only lasts 60 seconds, takes 20 seconds to recast and 5 seconds to cast. Having a secondary healer would definitely free up a WHM to do this. Spamming Poisona is almost pointless given the frequency our tanks were getting hit.
After 4 hours of trying to get it down and Kallo losing about 20k XP sac'ing it, we finally gave up. Not too much else to detail here other than I'm sure failure won't happen next time and if this is what is at the end of the ZNM system, I may be inclined to start taking it up.

Thursday, May 14, 2009

Soloing as Dragoon part 2: Gear

Cutting right to the chase today after my long and confusing post yesterday...

Gear

There are a number of absolutely essential pieces to get before even considering taking on the tougher monsters in this game. I'm not saying you can't, but these piece of gear significantly increase your chances for success. They are in order of importance:

There isn't a piece of gear more critical than this. When soloing, you must have the ability to get healing breath off as soon as possible. A lot of monsters have TP moves or spells they can cast that will remove more than half of your HP in a heartbeat. While it isn't the most potent piece of gear in terms of healing breath, it is the most potent in terms of survivability. The HQ version of this is a nice piece for raising the Spirit Link cap slightly or if you want to build a VIT set for your jumps (if you believe in it...it's more of a why not thing), but it makes no difference in the potency of healing breath or how soon you can use it.

This is the second most critical piece of gear. If Dynamis isn't your cup o' tea, then pick up a Saurian Helm as it's nearly as effective. Just straight up using this helm w/o a Drachen Armet will trigger healing breath at 33% HP. This is fine for those of you that like living on the edge, but at that point, it's really just a matter of one interrupted spell cast before you're KO'd. You could argue it's the most important piece as I view this piece separating the pretender soloing DRGs from the real ones. What puts the Drachen Armet over the top is simply how much HP you have after healing breath fires. Since the Drachen Armet can trigger it so much sooner, your HP ends up higher than if you wore the Wyrm Armet full time and only triggered at 33%. In the long run, Drachen Armet alone will be better for soloing than the Wyrm Armet, but when both are used in tandem with each other, it doesn't get more efficient than that for healing.

(And does anyone else find the image of switching hats in the middle of a fight extremely funny? "Hold on one sec there Mr. Mamool, I need to change my hat everytime I cast a spell.")

This piece should only be used when soloing. After the long post yesterday, the one line on here that states "Wyvern: HP+10%" should be enough of a reason to get these. As a matter of fact, go to limbus, get the upgrade pieces and make this the first piece of gear you turn into AF1+1. Accuracy +9 on a pair of pants and Wyvern: HP+15% can turn these into an arguably full time solo piece. Depending on what I'm soloing, if I feel like I don't need the HP boost from the pants, I'll switch back over to Homam Cosciales, but the vast majority of the time, I'm wearing these while I'm soloing. (I'll get into the whole "macro these in for healing breath" part in a different post.)

This is arguably the best earring in the game. When soloing, this is basically like having refresh built in as a Job Trait due to the fact Dragoons aren't exactly built like brick shithouses. On top of that, Dragoons usually need all the help they can get from an MP standpoint as they don't have a super huge pool to work with. This becomes even more apparent as you move up the race-size scale. You even get an HP, Attack and Evasion bonus. This earring is good enough to wear full time as the options for Dragoon are rather limited over all. There are options like the Fowling Earring, Coral Earring, Assault Earring, etc, but this earring basically combines all of those earrings into one with the exception of an accuracy bonus. If you have the Drachen Brais +1 though, you don't need anymore accuracy.

One important thing to note here with all the gear I've listed so far is that it's all rare/ex. You just simply have to put time and a little bit of gil in. You don't have to go farm up money for weeks on end and whatnot, you just simply have to go to your limbus or dynamis runs and you just have to finish a relatively simple BC (Apocalypse Nigh). The rest of the gear is something anyone can debate. My preferences slot by slot are:

Weapon

Love Halberd, Mezraq, Valkyrie's Fork. I'm not going to assume people upgraded Gungnir. I'm also going to assume that a lot of people are owners of a Thalassocrat. Any of these are fine, but prior to getting Gungnir, I generally preferred to use my Love Halberd over my Mezraq. Why? I usually would solo things that liked to cast a lot of magic. Love Halberd gave me a large number of hits thanks to it's "Occasionally attacks twice with virtue stones equipped" feature and low delay.

Mezraq/Thalassocrat are essentially the same weapon that end up parsing close to the same, but I don't believe for a second that over a long marathon fight that Thalassocrat is actually better than Mezraq. This is due to the fact Mezraq's STR+2 effects nearly every one of a Dragoon's weapon skill library and Thalassocrat's DEX+2 only modifies one (Penta Thrust).

If you have a V.Fork, then you pretty much have the best thing available short of Gungnir and can ignore everything else I said in this paragraph.

Sub

Pole Grip or Sword Strap. Take your pick.

Hat

Discussed above. If you have an Askar Zucchetto, Walahra Turban, or Ace's Helm, then you have yourself a full time head piece for TP gain and your Drachen/Wyrm Armets become macro pieces.

Body

This is a piece that I'm probably going to get some disagreements on. I'm not going to assume that people have an Ares's Cuirass, but if you do, good for you and ignore everything else I'm about to say.

Homam Corazza, Askar Korazin, Assault Jerkin, or Zahak's Mail are generally popular pieces. I'd only use Homam if I didn't have Askar or if I was having some serious accuracy issues or MP issues even though Triple Attack kicking in is funny to watch. I'd only use the Assault Jerkin if I didn't have Homam or Askar. Every time I see a Dragoon wearing Zahak's Mail full time though makes me cry. Askar body is easy to get with a solid Nyzul group, a little luck and some time and has a far greater benefit than wearing what amounts to a super Penta Thrust piece. Even then, Drakesbane is far better and if you're after an Askar hat or body, you're going to pick up the Radiant Lance along the way. Also, if you're willing to spend 6+ mil on Zahak's Mail, get your ass into Salvage, save up another 5 mil and get Ares's Cuirass instead.


Hands

Homam Manopolas, Dusk Gloves, Wyrm Finger Gauntlets or Tarasque Mitts/+1. I go Homam all the way while soloing. I need the MP from them and the haste is nice too. If Homam isn't an option, pick up some Dusk Gloves or Tarasque Mitts. Use Wyrm Finger Gauntlets if you're only concerned about accuracy and don't have Homam hands to cover it.

Earrings/Rings

Brutal Earring and Ethereal Earring are only options here. I detailed a few other earrings above if those aren't available to you, but you should at least make getting the Ethereal Earring a priority. Brutal Earring is super cheap now and virtually requires no work to get it, so there really is no excuse. Rings are a bit of a different beast as someone might already have different rings for finishing ToAU or CoP. I personally use a Rajas Ring and Ulthalam's Ring. I'll replace Ulthalam's Ring with an Ether Ring from time to time if I'm fighting stuff that likes to Aspir.

Back

Amemit Mantle/+1, Cerberus Mantle/+1, Forager's Manger, or Cuchulain's Mantle. Dragoon doesn't really have much for back pieces that lend itself to balancing itself out decently. Most of the options we have are pretty much geared towards generating offense. NQ Amemit Mantle is cheapest thing available and I certainly wouldn't expect someone to spring for a Cerb Mantle or a Cuchulain's Mantle. Sticking with an HQ Amemet Mantle or a Forager's Mantle is best option here.

Waist

Swift Belt, Wyrm Belt, or Warwolf Belt. If you're MP challenged like me, I use a Forest Rope and it certainly doesn't hurt having a little bit more MP up to a point. This piece allows me to minimize the number of MP+ pieces I wear and allows me to focus a little more on offense when it's needed. I know this is an Elvaan only piece, but there are other MP+ waist for the various races too. For the most part though, it's Swift Belt all the way. Warwolf Belt is generally a WS macro piece and Wyrm Belt is used primarily for a little boost in accuracy if it's needed.

Legs

Went over this already above while discussing Drachen Brais and Homam Cosciales. There really are no other options for soloing unless you have Ares's Flanchard. Barone Cosciales or Conte Cosciales are generally nice if Homam is not available, but put in the effort to get the Drachen Brais +1. An honorable mention goes out to Barbarossa's Zerehs as Homam-1, but again your soloing set should include a balance of everything and these tend to focus too much on offense

Feet

Homam Gambieras should be another high priority to pick up. I didn't list it as a critical piece because it's definitely not going to make or break your ability to solo, but the HP/MP+, Wyvern HP+ and Haste+ all in one piece isn't present anywhere else. Askar Gambieras make baby jesus cry, but are definitely better than wearing Rutter Sabatons full time. Buy Dusk Ledelsens if you're too lazy to Limbus or Nyzul. Wear Drachen Greaves or Wyrm Greaves if you're cheap and lazy.


Conclusion

I generally try to strike up a decent balance of gear when I'm soloing. I don't try to overload on HP+, Wyvern HP+, MP+ or Attack+. Haste is generally a priority, so you can never really go wrong with 4 of the homam pieces as full time pieces unless an Askar piece is better (in the hat's case). When I go out soloing, I try to make sure I have between 250-300MP minimum and try to make sure my HP's 50% mark is around 700.

There are lots of other pieces of gear for increasing healing breath, but again, loading up on Wyvern HP+ just prolongs a battle. Most fights are about simply outlasting your opponent, not smashing them into iddy biddy pieces or making sure you take take a little damage as possible.

Tomorrow I'll go over Merit Party/XP/Weapon Skill gear if time permits. :)

Wednesday, May 13, 2009

Soloing as Dragoon Part 1: Understanding Healing Breath

Prior to the updates for Dragoon mentioned in my last post, the best thing a Dragoon could do was be one efficient healing machine. Nothing really changed on that front except that we can generally kill stuff a lot faster now thanks to the two-handed update and the wyvern's ability to "level up" as long as you stay in the zone.

There are 3 different "classes" of wyvern. They are Offensive, Balanced, and Support and the class is determined by your subjob.

Offensive Wyvern

Uses elemental breaths based on the elemental weakness of your opponent. Not the most accurate critter in the world, but it gets the job done and often times will provide a clue about which type of magic is most effective against whatever it is you're fighting.

Offensive Wyvern types are available by subbing THF, SAM, RNG, WAR, MNK, BST, COR, PUP and DNC.

This type of wyvern will not use Healing Breath or use any form of status removal.

Balanced Wyvern

Available through using PLD, DRK, NIN or BRD as a subjob.

This wyvern will use healing breath and will use elemental breaths. It will not remove statuses and it will not heal other party members. In addition, you cannot activate healing breath until you're at 33% HP or below (with AF1 hat).

Support Wyvern

Available through using WHM, RDM, BLM, SMN, BLU or SCH as a subjob. This wyvern is your key to soloing. Pick your subjob based on what it is you're going to be fighting. I tend to look at using WHM if I'm going to be fighting stuff that likes to inflict a bunch of status effects. I'll sub RDM if I'm interested in being defense-oriented. I'll sub BLM if I'm just being completely lazy and want a warp home from farming things that have no chance of killing me.

With this wyvern, you have the ability to trigger healing breath at 50% health (with AF1 hat) for anyone in your party. You also have the ability to trigger status removal by using a weapon skill for anyone in the party as well. The status breath will remove Paralyze (level 40), Poison (level 1) or Blind (level 20) only.

There are three things that people generally fail to notice when using this wyvern.

1. YOU always have the wyvern's priority for any breath used. Your HP dropping below 50% or becoming inflicted with one of the 3 statuses listed above can cause some of the most well intentioned plans to fall flat on their face.

2. The person with the lowest HP PERCENTAGE has priority if you are not the priority.

3. Lastly is the range. Most people (especially mages...) don't understand that, in combination with the first two items listed here, that healing breath has a range limited to 13'. A wyvern will not move to the next healing target just because someone who meets the above criteria is out of range. You will essentially be cockblocked from healing anyone else in your party until you get said person in range.


Healing Breath

There are several factors that go into determining how this calculates it's end result. They are:

1. Drachen Armet/+1
2. Wyrm Armet/+1
3. Saurian Helm
4. Wyvern's Level
5. Wyvern HP+ Gear
6. Wyvern's Current TP (20% increments)
7. Deep Breathing

(I also suspect Lightsday and Darksday effect it, I just haven't gone out to test it myself.)

Without getting into the complex formula involved in calculating all of that, here are the basics you'll need to know:
  • Drachen Armet/+1 will trigger healing breath at 50% HP and gives the effect of Cure III.
  • Wyrm Armet/+1 will trigger healing breath at 33% HP and gives the effect of Cure IV.
  • Saurian Helm will trigger healing breath at 33% HP (not 100% certain on this, please correct me if I'm wrong as I have never used this hat before) and gives the effect of Cure III.5.
  • Every 200XP you gain increases your wyvern's level and grants a 6% bonus to healing breath up to 30% (5 levels for you non-math people out there).
If you're a formula nut, here goes...

Wiki has the current working formula to be as follows:

FLOOR(0.1757*(Drachen Brais Bonus + Wyvern XP Bonus + 1)*(Helm Bonus + Wyvern TP Bonus + Deep Breathing Bonus + 1)*(Wyv. HP + Wyv +HP gear)+42)

I personally don't think it's that complex. This formula might be 100% accurate, but if you're like me, I'm not going to spend time poring over every ten-thousandth of a percentage to figure out what the end result ends up being. There is a floor for healing breath w/o using any of the things that affect it and each hat grants a different level of healing breath. I believe SE has it broken down to something like this:

Healing Breath (Z) = (Wyvern's Max HP * Hat/No Hat modifier = W) + (Wyvern TP Bonus) + (W*Wyvern XP Bonus = Y) + (Deep Breathing bonus if used W * 60%).

Here's why I think it's this simple.

The gear that I use for soloing allows me to do a minimum healing breath of 409HP. This is with no XP or TP bonus. Using this as a basis, let's look at what pieces of gear I'm actually using that modifies my wyvern's HP and HB potency.

Wyrm Armet
Drachen Brais +1 (Wyvern HP+15%)
Homam Gambieras (Wyvern HP+50)
Chanoix's Gorget (Wyvern HP+50).

This means I need to determine two things.

What is the hat bonus for each of the respective hats that modify healing breath?
What is my wyvern's base max HP?

I'm theorizing the hat % works like this:

No hat = 16% of Wyvern's max HP.
AF1 hat = 26% of Wyvern's max HP.
AF2 hat = 36% of Wyvern's max HP.
Saurian helm = Unsure, but I would speculate it's approx 31%.

In determining what my wyvern's base max HP is, I've eyeballed damage (I don't use third party tools) my wyvern has taken and approximated that it's base max HP is 900. With my 3 pieces of gear, it's max HP becomes 1135. With no TP or no XP bonuses, our formula looks like this now (rounded up or down):

409 = (1135 * AF2 hat% of 36%) + (0) + (0).

Using AF1 hat, it looks like this:

295 = (1135 * AF1 hat% of 26%) + (0) + (0)

No hat at all looks like:

182 = (1135 * No hat % of 16%) + (0) + (0)

With full wyvern XP bonus, no TP , the use of Deep Breathing and the standard gear listed here, we see the following:

776 = (1135 * 36%) + (0) + (409*30%) + (409*60%)

And so on...

I know I'm not 100% accurate with this idea, but this is a much more general idea to go with in calculating how much healing breath will do. This theory also suggests that, using the wyrm armet, for every 50 HP you add to the wyvern, you're adding 18HP to your healing breath.

Tomorrow, I'll go over soloing gear sets in detail.

Tuesday, May 12, 2009

Dragoon History - Gaming and Personal

I'm not sure how many parts are going to be in this series of blog posts as I have a ton to say on this subject, but for now the general topics are going to be...order subject to change:


  1. History
  2. Soloing Gear
  3. Merit/XP Party gear
  4. Leveling Guide
  5. End Game usage
  6. Gungnir.
Historically, as it pertains to Square-Enix, the Dragoon job class has been present in nearly every Final Fantasy game since Final Fantasy II when Ricard Highwind made his appearance as a semi-playable character that sacrifices himself. Although they aren't specifically called "Dragoons" in some of the FF games, a signature move like "Jump" or the classic Dragon Helm design show nods to this character class all over the FF landscape. Pretty much anyone with the last name "Highwind" throughout the FF series is a Dragoon. Think Cid from FFVII. Kimahri Ronso from FFX. Freya from FFIX. The list goes on.

The most famous Dragoon in the FF series is arguably Kain Highwind from Final Fantasy IV (orignally II for the SNES in the US). As an 8th grade kid playing this game, I found the design and ability of this character to be very intriguing. From that point forward, if there was a character or job class in an FF game that could use a lance/spear or even remotely looked like a Dragoon, they were getting named "Qtipus" and used as much as possible. I even went as far as to fight Odin in the remake of FF3 for the DS for literally 7 hours until I was able to steal Gungnir from him.

When SE did a remake of FF4 for the Nintendo DS though, I bought that up in a heartbeat for two reasons:

The first is that I loved the game to begin with. I pretty much own every single version of that game to date.

And the second is:


How bad ass is that. That's pretty much what my imagination was kicking around when I originally played through this game and pretty much what inspired me to create the character of "Qtipus" in Final Fantasy XI.

Prior to creating Qtipus, I had little to no experience with the MMO world. My experience was limited to a couple months of EQ and a whole host of customers addicted to EQ that left me with a rather bad image of people who play MMOs (I'll make some work stories posts at some point). I had a decent idea what I was getting invovled with, but I really had no idea the sheer amount of time SE wanted me to invest. I wanted a max leveled dragoon though, so I ended up sticking with it.

When I initially started playing, Dragoon was considered one of the better DD jobs in the game. With a SAM sub and 60TP return from Penta Thrust (game's come a long way hasn't it...), it made the job ideal for pushing out a lot of damage in XP parties or on NMs and HNMs. As I got to level 50 though, SE started making some of the more drastic changes that helped to shape the systems we know today.

Unfortunately, Dragoon was a neglected job and considered very LOL for almost anything in this game. It was gimped enough by game mechanics that I was more or less forced to level White Mage to 60 in order to get to the uncapped portion of the Chains of Promathia missions. I spent years trying to show everyone that Dragoon wasn't as LOL as they thought when greatly equipped. In most merit parties, I was often the top DD in the party against the likes of E.body/Ridill Warriors and full haste Ninjas. If I wasn't the top, I wasn't 2nd place by much. Dragoon's primary shortcoming was against end-game bad guys where, for whatever reason, our acc and damage ratings just went to complete shit.

But then it happened.

Dragoon's two hour was changed from "Call Wyvern" to "Spirit Surge". This gave us a legitimate means of spiking our damage in nearly the same manner as WAR or SAM. Still wasn't as high as those two jobs, but it was a significant improvement.

"Call Wyvern" timer was reduced to 20 minutes.

Dragoon's armor choices were expanded to include a lot of the heavy end-game armor used by Warriors or Dark Knights to increase damage output.

Hasso and Seigan added to Samurai as subjob abilities accentuated our abilities to shed hate and provide us with enough of a chance to shed it so that we weren't sucking MP pools dry as much as well as providing us with a much needed JA Haste and Damage boost.

Group 2 merits gave us the ability to spike our wyvern damage with the proper gear and macro use. Also gave us the ability to increase EVERYONE'S physical damage output through the use of Angon.

...and most of all.

SE fixed Two-Handed weapon accuracy and damage calculations.

I spent years sitting on the sideline because of game-mechanics. I often built my gear around making sure I was prepared to open skillchains as accurately as I could. After the updates, my gear choices went from loading up on accuracy to loading up on attack bonuses. Even before I got Gungnir, Mezraq was still more than enough to show that Dragoon was there to stay as it compared to overall damage out put. We're still not going to be the spike-damage masters that a Warrior or a Samurai are going to be, but in the right set ups, a Warrior and a Samurai will need that spike damage to keep up with a Dragoon's overall damage output.

(Duh...putting a COR or a BRD with any DD will increase a party's damage.)

(They still don't have a wyvern and meritable job abilities that lets them spike damage for two entities, not just one.)


Fun Facts!

Dragoon isn't just limited to the Final Fantasy series.


  • The Dragoon concept makes an appearance in the first three Suikoden games through the character of Futch the Dragon Rider.
  • There is a type of pigeon named "Dragoon" used as a carrier.
  • The Gundam series uses a DRAGOON system.
  • And if anyone needed another reason to make fun of Canada's military...there's the Royal Canadian Dragoons, the British Columbia Dragoons and the Saskatchewan Dragoons. While most would "lolcanadianmilitary" and "loldrg" at this sentence, my respect level went up .3 for the Canadian military.
  • We even named a military strike as Operation Dragoon. See your history Canuck? "Dragoons" liberated southern France from the German army. The USA has a branch of the military called the First United States Dragoons that was reformed during the Vietnam war and is still carrying out operations in Iraq as America's oldest and most decorated Cavalry Unit. My respect level for the Canadian military just deleveled. YOU WERE COOL FOR A SECOND UNTIL, AS USUAL, THE USA DID IT BETTER.
  • We have a Dragoon Trail in Iowa commemorating it's initial exploration by the USA's First Dragoons.
  • Dragoon Mountains. Need I say more?
  • Legend of Dragoon. So much potential...so little results.
  • Unfortunately, I have to thank the French for coining the word "dragoon". Which was basically a reference to an old gun they probably never fired or dropped at the sight of a battle.
  • The original Dragoons were soldiers trained in both ground fighting and horse-back fighting. They are still used by various countries around the world and are widely considered to be among the most prestigious units in each of their respective armies though they often times do not actually see battle (insert loldrg joke here).

Anyway, tomorrow I'll try to go over the various facets of soloing as a Dragoon. This will include gear choices, subjob preferences and whatever else I can think of to add that is specifically related to the soloing limits of Dragoon.

Qtipus' Information

FFXI subscriber since NA release.